It’s Halloween time! Hurray! It’s also that candied time of year where the kid in all of us seems to come alive, like when we used to explode out the front door on October 31st, in full costume with pillow case in hand, at the first sign that nighttime had come!
With that kind of child-like enthusiasm, we thought it would be fun to offer a project to welcome your neighborhood ghosts and goblins as well. Here now is the Newspaper Candy Corn Door Monster! It cost under $10 and is super fun to make! Sweet!

Tip! Having an arsenal of tools in your workshop or garage (like a paint sprayer) saves so much in terms of time and money. Coming soon…must-have, basic tools for the home DIYer!
See also: How to Make a Halloween Paper Bag Door Monster
And, because we just installed a Dutch door (more to come on that soon!), I specifically designed it to be split in two (although, it can easily be modified for a single solid door).
The hour is getting late, so…grab a handful of candy corn, kids, and let’s get to it!
Candy Corn Door Monster Supplies:

- newspaper and cardboard
- Scissors
- measuring tape or yard stick
- painters tape
- HomeRight Finish Max paint sprayer
- acrylic and craft paint (for the acrylic, we bought a sample size for under $5)
- pencil or sharpie
- dessert paper plates
- black and green stick-on sparkle paper (Michaels has tons of colors, too)
- string
- removable mounting putty
- small finishing nails (optional)
How-to:
1. Measure the dimensions of your front door: using your tape measure, find the length and width of your CLOSED front door and write it down – for Dutch doors, you’ll have two sets of measurements for the top and bottom section. Note: be sure to measure the part of your door that appears when closed. The paper will last longer if it isn’t being creased and mashed by the frame.
2. Measure the length and width, then tape your newspaper pieces together: knowing the length and width of your door, pull out your tape measure, then adjust your newspapers to fit these dimension. Then, simply tape your newspapers together – super easy!
3. Cut candy corn-shaped teeth out of your paper plates, then paint. You should start with this step so they can dry in time to place them into your monster’s mouth.
4. Place where you want the eyes on your newspaper piece, then cut the hole: now that you have your newspaper perfectly custom sized, decide where you’d like to place your eye(s). Note: there are no rules here…if you want 1 or 4 eyes…that’s up to you! Just be sure to cut a hole big enough to accommodate the number you want. Also, if you have a door with a color other than white, you can add a paper plate behind your stick-on sparkle paper…or not!
5. Measure and cut out mouth: if you have a colored door, cutting out your mouth will have a fun effect. Note: if you have a white door, you may want to just draw a mouth or add colored paper to the backside of the opening so your teeth will show up better.
6. Thin your paint for the HomeRight Sprayer. This is one of my most favorite tools! You can watch this video: How to thin Enamel Paint for the HomeRight Sprayer. If you don’t have a paint sprayer, you can use spray paint as well.
7. Spray paint your newspaper piece(s), then allow to dry. You’ll need to weigh it down with some rocks or weights, as the paper is light. Be sure to remove the rocks or weights and spray underneath. Also, make sure to lift them off so they don’t stick to the paper (this was the only annoying part of this project). Note: don’t worry about spraying the newspaper solid…the articles underneath give it a cool look and shows that YOU made it yourself…yeah!
8. Strengthen your newspaper with painters tape, then tape in teeth. This is a VERY important, but easy step and will make hanging your newspaper super easy. Just tape the BACKside of your newspaper along the edges and around the mouth and eye hole. This will help keep it from ripping while hanging.
Regarding the teeth…have fun with this! The number and spacing will effect your monster’s look and personality!
9. Cut out the eyes, then hang. Taking your sparkle paper, cut out the eye(s) to fit inside the hole you’ve made in your newspaper. Be sure to make two sets for each eye (so that if the wind flips it, you’ll still be able to see the eye on the other side…genius!). You can either stick them to a cardboard piece, or to each other. Before sticking together completely, place a string in between the sticky part for hanging.
10. Measure, cut, curl, then tape on your monster’s hair piece. You can make the hair as long or short as you wish. You can leave raw or paint it another color. Here’s what you do…
a. Measure your newspaper hair piece to fit the width of your monster’s head.
b. Cut 1″ strips against the length of your newspaper, but not all the way across – leave about 3″-4″ on one side uncut.
c. Like curling ribbon, use your scissors to do the same – be gentle, as it can rip fairly easily.

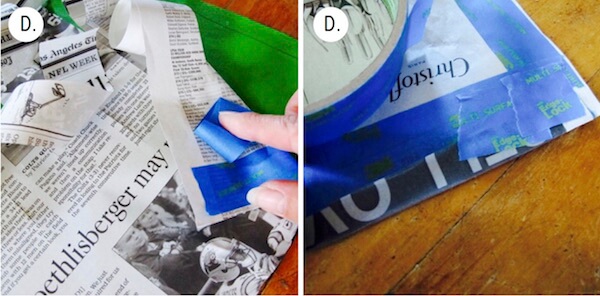
d. Tape the uncut side to the top of your monster’s head. Overlap the top about 3/4″ so you can fold it over the top and tape on the backside of your monster. It’s good to first tape the piece underneath on the frontside to keep it in place.

11. Using removable mounting putty, hang your monster. Note: be sure to cut the holes for your lock and door knob. Also, I added a few very small finishing nails (see photo) just for added security – but the putty really works, too.
Candy Corn Monster Finished!
All photography by Skaie Knox, HomeJelly


