Berries: sweet, tangy, tart and textured. These starlets of the fresh produce aisle are expensive for a reason-they are finicky little divas! Notoriously picky and prickly, berries don’t like getting their toes wet, and thus thrive in raised beds with good drainage. They also require supports/trellises for their canes, room for their runners and they don’t play well with others. Raspberries particularly have to be grown secluded from strawberries and tomatoes because they are prone to similar diseases. So, what’s a backyard-weekend-DIY-gardener to do?
Build their own raised bed berry patch, of course! However, raised beds usually require wood which isn’t great for the planet, and a trip to the hardware store which isn’t great for our wallets. A little Earth Day inspiration and well, being broke, was the mother of ingenuity on this repurpose project.
Oh, and did I mention the gopher? Yes, we suddenly made a new friend the moment we planted a vegetable garden. Now, because I refuse to go all “Caddyshack” on its furry little tush, and because I truly believe that he has a right to eat and be a gopher, we needed raised beds with a solid bottom. This meant using even more wood…or did it?
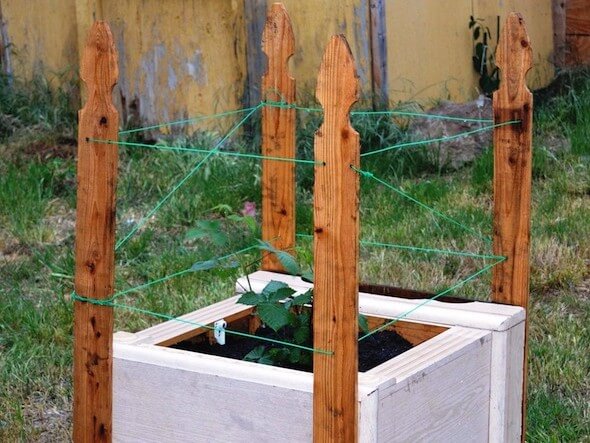
Suddenly, I had a repurpose epiphany: the bedroom set. The older they are, the sturdier and heavier they are! We’ve seen them used upright with the drawers serving as planter boxes, but laying them on their backs allows for more space, and you can still use the drawers separately.
This nightstand did not have a base below the removable bottom drawer so we grabbed a plank and nailed it to the base, then just sawed off the excess. No measuring twice, just cutting (don’t tell my Habitat construction coworkers, though). Once the nightstand was lying on its back, we made drainage holes. This can be done precisely with a drill or immediately with an awl or hand-ax. Of course, it was drizzling this day so power tools were not an option…ax it was!
Now, I do realize that not everyone has hardware remnants just lying around, so get creative-this is the planet we’re talking about! Ask a friend, check DiggersList or a Habitat ReStore, support your local swap meet, or take a walk around your block to see if a neighbor has free stuff sitting on the curb.
We had recently deconstructed an old fence and built a new one in its place. We were able to salvage the nails from the old fence (trip to the hardware store averted) and four picket pieces from excess remnants from the new fence.
These picket pieces were simply hammered into the sides of the nightstand to create support posts. Then we threaded weed wacker trimmer line to create the trellis. You can use rope or wire as long as its tensile strength will support a berry-laden vine while also weathering the elements.
Good (deconstructed) fences make good trellises.
It took 6 cu. feet of soil, garden amender and manure to fill this seemingly small container. There you have it! An old nightstand repurposed into a raised bed garden. Where function and fashion meet thrifty and eco-savvy.
For those of us who don’t speak “Master Gardener”, there is a fabulously, comprehensive raspberry growing tutorial by Darlene White at FineGardening.com.
Recognizing legitimate concerns regarding the reality of material degradation and possible bio-contamination, I pondered, “Are container gardens safe?” In actuality I could not find many scientific articles on the subject, probably because it’s too early to know with certainty. I did find that the Lance Armstrong foundation’s health resource website Livestrong.com lists an article entitled “Which Plastics Are Safe To Use As Containers To Grow Food” citing specific containers and their plastic-shed toxins. They found no bio-amplification or transmission of chemicals into the foods grown in containers.
Some of the items pictured are available at the Riverside ReStore for 50% less than retail. See their DiggerList storefront here.
All photos and repurposing idea courtesy of our friends at:
For more information please email our repurpose team at [email protected]


