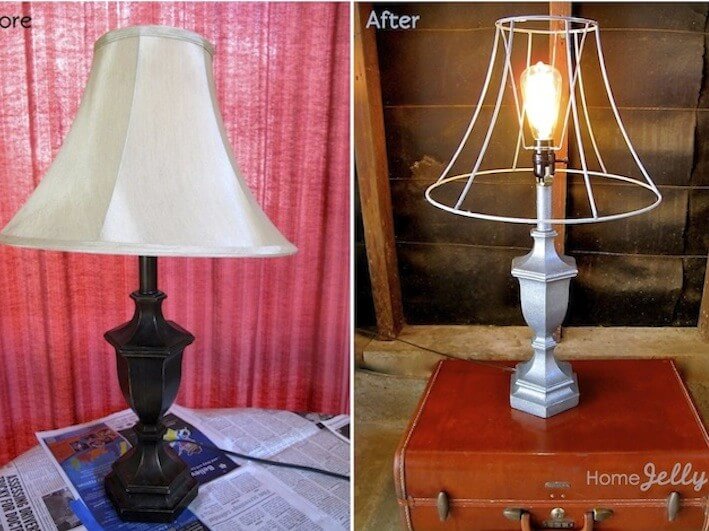
Hand-me-down furniture can really be hit or miss. I was actually given this “before” lamp as two separate pieces, leftovers from Johnnie and Lexi’s recent move from Tucson to LA. After making several “Peek-a-boo” lamp shades, I figured this lamp base would work perfectly to take pictures of them for our HomeJelly Sweet Shop. I thought I could use the shade for something…I just wasn’t sure for what. Though, I wasn’t in love with the material of the covering, its frame was quite structural. It also fit the base quite nicely, but that wasn’t anything special either. Inspired by rocker turned designer, Antonio Ballatore, I figured I’d go industrial glam and finally put to use this can of glitter finish I’ve had sitting on the shelf for months. I’m quite pleased by the results and hope this inspires you to take a hand-me-down piece of decor and give it a little bam!
Before I got started…
I deconstructed this lamp base and shade at my mom’s house in Orange County and forgot my drop cloth, so I had to make do. With a simple stack of newspapers and some tape, I was able to customize this one for pennies. Okay…on we go.
Here’s what you’ll need:
- cloth
- fine grit sandpaper (P220-P150), wire brush
- medium sized paint brush
- All-medium craft paint (I chose metallic chrome/silver)-not shown
- glitter specialty finish (I used Martha Stewart Glitter Paint)
- Scissors
- painters tape
- clear coat finish (I used Rust-Oleum Multi-Purpose Spray Paint, Gloss Clear)
- Edison light bulb (I used Feit’s The Original Vintage Style Clear Bulb
)
Here’s what you do:
1. Sand to roughen base. No need to sand off all the old finish. This is supposed to look sort of rough around the edges, so, this step is to allow the new paint to stick. Be sure to use your cloth and wipe clean of sanding debris before going on to next step.
2. Paint base. Place your lamp base on a can to more easily paint the bottom portion. I had to use three coats, but it didn’t take long at all. Ready for the glitter! Whoohoo!
3. Apply glitter finish. The key to this step is the paint color you chose as the base color. At first, I tried to just use this as the first coat over the sanded color. Nope…it didn’t take at all. This finish is more like a clear base with just a touch of silver tint and a lot of glitter. Once I painted the base a solid silver, this finish went on totally easy and looked fabulous with just one coat! Yeah!
4. Deconstruct the lamp shade. I have to admit, I was a little nervous taking apart a perfectly, albeit, ugly colored lamp shade, but once I cut into it, it was game over. There was something very educational about removing the covering and seeing how it was originally put together. In the end, I was left with a fantastically sculptural piece.
5. Spray on clear coat. Be sure to first tape off the cord (I then placed the rest of the cord in a plastic bag) and wrap tin foil around the light bulb housing. The key to spraying on clear coat it to use long, even strokes from about 10″ to 12″ away. I didn’t overdo it, just sprayed on a light, even coat. Let the paint and clear coat cure for 24 hours…Yup! That’s about right!
6. Place deconstructed shade onto light bulb housing, screw in your light bulb and Bam! you’re done!
What do you think about this deconstructed lamp? Have you ever done something like this with a hand-me-down piece of decor?
I’d like to thank my model “Klunkers” for his fantastic work and for happily accepting his fee of one chicken nibble.
Photography by Skaie Knox, HomeJelly.com


