We can all agree that mason jars are adorable and wonderful “decor morsels” for special occasions. But after my wedding, I was left with so many of them, I didn’t know what to do with all the leftover jars. Sure, you can fill them with chocolate chip cookie ingredients, but then you’re stuck baking nothing but cookies for the rest of eternity. I decided to tie the jars tastefully and creatively into my home. Here’s how I did it.
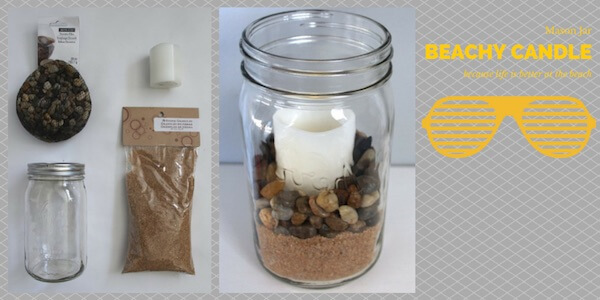
1. The Beach Jar
I’m a sucker for the beach and find myself constantly missing it during the winter months. Now, I have a piece of it right at home with my mason jar. This one feels warm and cozy and can be placed almost anywhere around the house.
–
Supplies:
• a bag of sand
• a bag of pebbles
• a candle
• a mason jar
Instructions:
1. Pour the bag of sand into the jar. Smooth the sand so it’s nice and even.
2. Next, place your candle in the center. A tea light candle will be too short, so opt for something a few inches taller.
3. Pour the bag of pebbles into the jar and arrange them around the candle. You don’t want the pebbles to surpass your candle; you want it to stick out about an inch.
I love to collect shells from the vacations my family goes on so I always place one of the shells I find on top of the stones as a reminder of good times.
–
Fun Option: Instead of pebbles, you could fill the jar with shells for a super-beachy look!
2. The Jar Holder
There are a few items in my bathroom that desperately need a home. With this mason jar, I’m able to keep my things neat and tidy in an aesthetically pleasing way.
Supplies:
• a sponge brush
• Mod Podge
• chalk
• chalkboard labels
• some fabric
• mason jar(s)
Instructions:
1. Choose the appropriate amount of jars, depending on how many items you need to store.
2. Cut your piece of fabric into a 2-3 inch strip (depending on the size of your jar) to fit perfectly around the bottom half of your jar. You can measure by rolling it from one end of your fabric, then wrapping it around where the fabric ends just barely overlap.
3. Cover the bottom half of your jar in Mod Podge; applying it carefully with the sponge brush. Use the gloss kind so it dries clear. Don’t be too stingy with it; you’ll be sticking your fabric to it.
4. Place your fabric onto the glued area, then carefully wrap it around. You’ll want to apply a little more Mod Podge to the overlapped fabric piece to secure, then possibly to the bottom, so that the fabric really sticks to the rounded, bottom edge.
5. On the upper un-fabric-covered half of your jar, stick your chalkboard label in the center.
6. Lastly, take your chalk and label the jar accordingly. I filled mine with Q-tips and brushes.
Fun Option: You can use all kinds of fun fabrics and place these functional decor holders anywhere in your home like, your kitchen, craft room, office, entryway, etc.!
3. The Terrarium Jar
Whether you love the outdoors or only want to invite a small amount into your home, this jar is the perfect accessory. For ease of care, you can insert very life-like artificial plants.
–
Supplies:
• a bag of moss
• a bag of pebbles
• decorative plants/greenery and/or succulents
• mason jar(s) 2 sizes
Instructions:
1. Simply add the pebbles to the bottom of the jar. I used two different sized jars, so they look nice as a set.
2. Apply the moss on top of the pebbles.
3. Lastly, arrange the artificial plants/greenery or super-easy-to-take-care-of and drought tolerant succulents on top. Note: for succulents, you’ll want to add a layer of potting soil over the pebbles, then the succulents, then you can fill in any spaces with moss.
Fun Option: you can do the same in a super large mason jar, then add tea candles, and/or some little plastic animals for a quirky twist!
–
Adding a few of these mason jars to your home will step up its ambiance. They transform ordinary items to decorative pieces with an earthy feel. These mason jar ideas are subtle enough to not clash with your current style and are simple enough to be done in a short amount of time.
All photography by Ali Lawrence, HomeJelly


